

How to build Todo List App using Vanilla Javascript ?


Introduction
In this blog we are going to build a full fledged todolist website using Vanilla Javascript. On the internet most of the todolist app are built of using libraries like Reactjs, Nodejs, Django, Angular etc beacuase it reduces the code. But why I am using javascript if it is complicated ?. The answer is simple to take you through best practices of javascript.
In this tutorial we will learn basics to advance concept of HTML, CSS and Javascript. In javascript we will learn the concept like javascript Objects, DOM (Document Object Model), BOM (Browser Object Model), Javasript web API like localstorage and formAPI. I will try my best to explain each and every topic that has been used in the project. I will also explain how to change HTML elements and CSS property dynamically.
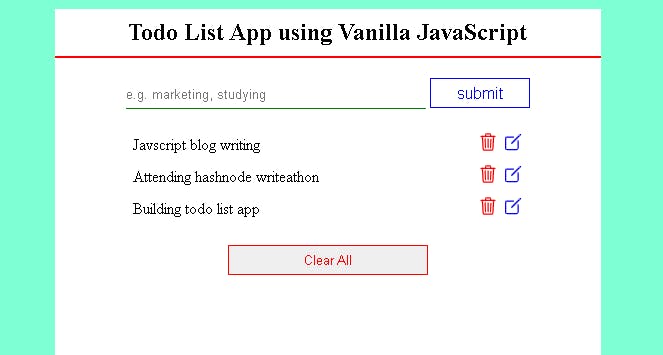
Before we deep dive into the project tutorial look at the glimpse of project we are going to create together. If you want to see live click on the project image
Pre-requisite
First you need and IDE (Integerated Development Environment) to write code, like VScode, NetBeans and Eclipse etc. I am using VScode, If you don't have any IDE install you can download VScode from here
As far as tech skills are concerned this blog is needs basic understanding of HTML, CSS and Javascript. Even if you don't know about these things and want learn website development, you can also start with this basic project. You will get to learn best practices of HTML, CSS and javascript.
Getting Started with the project
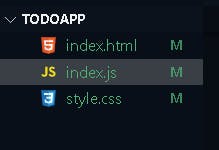
First create a folder named todlist and open it on the VScode. We will need three files index.html, style.css and index.js. Your folder structure should look like this.
Setting up the HTML page
Here we are creating a section center that will displayed at center as you must have seen above. This section contains two div elements and one para element to display the message when any events occur like adding, deleting and editing. One of the div element is for form and other for todolist, todolist is primarily displayed as none, when there is todo then it will be displayed as block.Todo container will be rendered dynamically through javascript.
index.html
<!DOCTYPE html>
<html lang="en">

<head>
    <meta charset="UTF-8" />
    <meta http-equiv="X-UA-Compatible" content="IE=edge" />
    <meta name="viewport" content="width=device-width, initial-scale=1.0" />
    <title>Todo List using JavaScript</title>
    // <!-- Links to the css file -->
    <link rel="stylesheet" href="style.css" />
</head>

<body>
    <main>
       // <!------- section center start ------->
        <section class="section-center">

            <h2>Todo List App using Vanilla JavaScript</h2>

            <form class="todoform">

               // <!-- below para alert will show success and failure messages -->
                <p class="alert"></p>

                <div class="form-elem">
                    <input type="text" class="inputtext" name="todo" id="todo" placeholder="e.g. marketing, studying" autofocus />
                    <input type="submit" class="submit" value="Submit" />
                </div>

            </form>
           // <!-- todo container holds all the todo list -->
            <article class="todo-container">
                <div class="todo-list">

                   // <!-- below commented todo item will be rendered dynamically through javascript -->

                   /* <!-- <div class="todo-item">
                        <p class="title">Item 1</p>
                        <div class="button-group">
                            <ion-icon class="delete" name="trash-outline"></ion-icon>
                            <ion-icon class="edit" name="create-outline"></ion-icon>
                        </div>
                    </div> --> */
                </div>

               // <!-- clear all button -->
                <div class="clear-btn">
                    <button class="clear">Clear All</button>
                </div>
            </article>
        </section>
       // <!------- section center end ------->
    </main>

   // <!-- Refrence to the javascript file -->
    <script src="index.js"></script>
    //<!-- Scripts CDN links of ion-icon  -->
    <script type="module" src="https://unpkg.com/ionicons@5.5.2/dist/ionicons/ionicons.esm.js"></script>
    <script nomodule src="https://unpkg.com/ionicons@5.5.2/dist/ionicons/ionicons.js"></script>
</body>

</html>
Setting up the CSS
This tutorial is mainly focused on javascript, so I will not explain each and every styling.
The main points that you need to consider is that we initially set todo-container class as visibility: none. When we will have todo item then we will add show-container class dynamically through javascrip whose property has been set as visibility: visible in the style.css file below, and items will be visible on the screen.
The same rules goes for alert paragraph .alert is display as none, then we have two classes alert-danger and alert-success that will display alert on any action happened like, adding, deleting, editing.
I have also added @mediaqueries to make the todoapp responsive.
style.css
* {
    /* This is for removing default behaviour of documents */
    margin: 0;
    padding: 0;
    box-sizing: border-box;
}

html {
    /* it wont be  scrollable in s direction*/
    overflow-x: hidden;
}

main {
    /* this is the css property of main tag */
    min-height: 100vh;
    display: flex;
    justify-content: center;
    background-color: aquamarine;
}

.section-center {
    margin: 100px 0px;
    background-color: white;
    min-height: 200px;
    width: 40%;
    display: flex;
    flex-direction: column;
}

.section-center h2 {
    padding: 10px 0px;
    text-align: center;
    border-bottom: 2px solid red;
}

.todoform {
    display: flex;
    flex-direction: column;
    align-items: center;
    justify-content: center;
    margin: 20px 0px;
}

.alert {
    background-color: azure;
    text-transform: capitalize;
    width: 400px;
    height: 20px;
    display: none;
}

.alert-danger {
    color: red;
    background-color: wheat;
    display: block !important;
}

.alert-success {
    color: rgb(4, 86, 28);
    background-color: wheat;
    display: block !important;
}

.inputtext {
    border: none;
    border-bottom: 1px solid green;
    outline: none;
    width: 300px;
    height: 30px;
}

.submit {
    background-color: white;
    color: blue;
    font-size: 16px;
    height: 30px;
    width: 100px;
    border: 1px solid blue;
    cursor: pointer;
    transition: all .5s;
    -webkit-transition: all .5s;
    -moz-transition: all .5s;
    -ms-transition: all .5s;
    -o-transition: all .5s;
}

.submit:hover {
    background-color: bisque;
}

.todo-container {
    display: flex;
    align-items: center;
    justify-content: center;
    flex-direction: column;
    visibility: hidden;
}

.show-container {
    visibility: visible;
}

.todo-item {
    display: flex;
    align-items: center;
    padding: 3px 5px;
    justify-content: space-between;
    width: 400px;
}

.button-group {
    display: flex;
    flex-direction: row;
}

.delete {
    transition: all .5s;
    color: red;
    font-size: 20px;
    cursor: pointer;
    margin-right: 2.5px;
    -webkit-transition: all .5s;
    -moz-transition: all .5s;
    -ms-transition: all .5s;
    -o-transition: all .5s;
}

.delete:hover {
    color: brown;
}

.edit {
    transition: all .5s;
    font-size: 20px;
    margin-left: 2.5px;
    color: blue;
    cursor: pointer;
    -webkit-transition: all .5s;
    -moz-transition: all .5s;
    -ms-transition: all .5s;
    -o-transition: all .5s;
}

.edit:hover {
    color: skyblue;
}

.clear {
    border: 1px solid red;
    color: red;
    width: 200px;
    height: 30px;
    cursor: pointer;
    margin: 20px 0px;
    transition: all .5s;
    -webkit-transition: all .5s;
    -moz-transition: all .5s;
    -ms-transition: all .5s;
    -o-transition: all .5s;
}

.clear:hover {
    border: 1px solid brown;
    background-color: white;
    color: brown;
}


/*Media quesries is used to set webite responsive on different devices */

@media (max-width:1100px) {
    .section-center {
        margin: 100px 0px;
        width: 60%;
    }
    .alert {
        height: 20px;
        width: 400px;
    }
}

@media (max-width:750px) {
    .section-center {
        margin: 70px 0px;
        width: 80%;
    }
    .todo-item {
        width: 300px;
    }
    .alert {
        height: 20px;
        width: 300px;
    }
}

@media (max-width:600px) {
    .section-center {
        margin: 50px 0px;
        width: 95%;
    }
    .todo-item {
        width: 300px;
    }
    .alert {
        height: 15px;
        width: 300px;
    }
    .submit {
        height: 15px;
        font-size: 12px;
        width: 50px;
    }
    .section-center h2 {
        padding: 5px 0px;
    }
    .inputtext {
        width: 300px;
        height: 15px;
    }
}
Working on Javascript
Here the main struggle starts, you need to read it carefully, if you don't understand it at once read again.
First we are selecting all the HTML elements that we will need here, through Doument Object Model property. Below is the code.
Note- use document.getElement property only when you have id attributes, otherwise use document.querySelector.
//Selecting items
const alert = document.querySelector(".alert");
const todoform = document.querySelector(".todoform");
const todo = document.getElementById("todo");
const submit = document.querySelector(".submit");
const todoContainer = document.querySelector(".todo-container");
const todolist = document.querySelector(".todo-list");
const title = document.querySelector(".title");
const clear = document.querySelector(".clear");
Now we are creating three edit flag variables that will be used later,
//Edit options
let editElement; //this variable will be used to store the todo-item that will be edited
let editFlag = false; //setting the edit state as false
let editId; //we need editId to edit the particular item
Now we will create a addItem function with three conditional statements
- Is the item is being added
- Is the item is being edited and
- Is the input value is empty
If the item is being added then we will call CreateList function that will take value and id as parameters, and CreateList function will create todo-item element like,
const addItem = (e) => {
  e.preventDefault(); //javascript event function to prevent default behavior of browser
  const value = todo.value;
  const id = new Date().getTime().toString();
  if (value && !editFlag) {
    createList(id, value);
}

const createList = (id, value) => {
  const element = document.createElement("div");
  const attr = document.createAttribute("data-id");
  attr.value = id;
  element.setAttributeNode(attr);

  element.classList.add("todo-item");
  element.innerHTML = `
            <p class="title">${value}</p>
            <div class="button-group">
                <div class="delete">
                <ion-icon name="trash-outline"></ion-icon>
                </div>
                <div class="edit">
                <ion-icon  name="create-outline"></ion-icon>
                </div>

            </div>
        `;

  //appendchild
  todolist.appendChild(element);
};
As you can see above that in createList function we are creating two buttons edit and delete, whose refrence had not been taken previously because it would return undefined. But we need edit and delete button refrence, so after calling createList function we are taking refrence of these two buttons below createList function.
We are calling editItem and deleteItem functions as well on click event, that we will create later.
//Deleteing and editing
    const deleteBtn = document.querySelector(".delete");
    deleteBtn.addEventListener("click", deleteItem);
    const edit = document.querySelector(".edit");
    edit.addEventListener("click", editItem);
We need displayAlert functions to display the messages on event occur, it takes two arguments one is message text and other is action like success and danger
//Displaying alert function
const displayALert = (text, action) => {
  alert.textContent = text;
  alert.classList.add(`alert-${action}`);

  //remove alert
  setTimeout(() => {
    alert.textContent = "";
    alert.classList.remove(`alert-${action}`);
  }, 1000);
};
Now we are creating four functions based on Localstorage API
const addToLocalStorage = (id, value) => {
  const todo = { id, value };
  let items = getLocalStorage();
  console.log(items);
  items.push(todo);
  localStorage.setItem("todolist", JSON.stringify(items));
};

const setBackDefault = () => { //This functions sets back to default when any events get successed
  todo.value = "";
  editFlag = false;
  editId = "";
  submit.value = "submit";
};

const editLocalStorage = (id, value) => { //Editing from Locastorage
  let items = getLocalStorage();
  items = items.map((item) => {
    if (item.id === id) {
      item.value = value;
    }
    return item;
  });
  localStorage.setItem("todolist", JSON.stringify(items));
};

const removeFromLocalStorage = (id) => { //Removing from Locastorage
  let items = getLocalStorage();
  items = items.filter((item) => {
    if (item.id !== id) {
      return item;
    }
  });
  localStorage.setItem("todolist", JSON.stringify(items));
};
const getLocalStorage = () => {  //Fetching todo item from localstorage
  return localStorage.getItem("todolist")
    ? JSON.parse(localStorage.getItem("todolist"))
    : [];
};
Call addToLocalStorage, DisplayAlert and SetBacktoDefault functions inside addingItem conditons block,
//Display alert
    displayALert("Item added", "success");

    //Show todocontainer
    todoContainer.classList.add("show-container");

    //Add to localstorage
    addToLocalStorage(id, value);

    //Setback to default
    setBackDefault();
Adding functionality has completed, Now if the item is being edited set EditFlag to true, and inside block call editLocalStorage, DisplayALert and setBacktoDefault functions,
else if (value && editFlag === true) {
    editElement.innerHTML = value;
    displayALert("value changed", "success");
    //Edit locastorage;
    editLocalStorage(editId, value);
    setBackDefault();
At last we have if the input element is empty then just call DisplayALert function and pass second parameters as danger,
else {
    displayALert("please enter value", "danger");
  }
addItem function is completed, Now we will create clearAll function to delete the all items at once, and deleteItem and editItem functions,
//Clear at all
const clearAll = () => {
  const items = document.querySelectorAll(".todo-item");
  if (items.length > 0) {
    items.forEach((item) => {
      todolist.removeChild(item);
    });
  }
  todoContainer.classList.remove("show-container");
  displayALert("empty lsit", "danger");
  setBackDefault();
  localStorage.removeItem("todolist");
};

//Delteing item
const deleteItem = (e) => {
  const elem = e.currentTarget.parentElement.parentElement;
  const id = elem.dataset.id;
  todolist.removeChild(elem);
  //if no todo then remove todocontainer
  if (todolist.children.length === 0) {
    todoContainer.classList.remove("show-container");
  }
  displayALert("item removed", "danger");
  setBackDefault();
  removeFromLocalStorage(id);
};

//Editing functions
const editItem = (e) => {
  const elem = e.currentTarget.parentElement.parentElement;
  editElement = e.currentTarget.parentElement.previousElementSibling;
  todo.value = editElement.innerHTML;
  editFlag = true;
  editId = elem.dataset.id;
  submit.value = "Edit";
};
All the functionalities is completed, Now we have to just addEventListener to the required HTML elements.
Here we have three eventlisteners,
- When the submit button is clicked
- When the clear button is clicked and
- When the content is loaded, or we can say when we open our document
//Add Eventlistener
todoform.addEventListener("submit", addItem);
clear.addEventListener("click", clearAll);
//load items
window.addEventListener("DOMContentLoaded", () => {
  let items = getLocalStorage();
  if (items.length > 0) {
    items.forEach((item) => {
      createList(item.id, item.value);
    });
  }
  todoContainer.classList.add("show-container");
});
Below is the all the javascript code
index.js
//Selecting items
const alert = document.querySelector(".alert");
const todoform = document.querySelector(".todoform");
const todo = document.getElementById("todo");
const submit = document.querySelector(".submit");
const todoContainer = document.querySelector(".todo-container");
const todolist = document.querySelector(".todo-list");
const title = document.querySelector(".title");
const clear = document.querySelector(".clear");

//Edit options
let editElement;
let editFlag = false;
let editId;

//Displaying alert function
const displayALert = (text, action) => {
  alert.textContent = text;
  alert.classList.add(`alert-${action}`);

  //remove alert
  setTimeout(() => {
    alert.textContent = "";
    alert.classList.remove(`alert-${action}`);
  }, 1000);
};

const addToLocalStorage = (id, value) => {
  const todo = { id, value };
  let items = getLocalStorage();
  console.log(items);
  items.push(todo);
  localStorage.setItem("todolist", JSON.stringify(items));
};

const setBackDefault = () => {
  todo.value = "";
  editFlag = false;
  editId = "";
  submit.value = "submit";
};
const editLocalStorage = (id, value) => {
  let items = getLocalStorage();
  items = items.map((item) => {
    if (item.id === id) {
      item.value = value;
    }
    return item;
  });
  localStorage.setItem("todolist", JSON.stringify(items));
};
const removeFromLocalStorage = (id) => {
  let items = getLocalStorage();
  items = items.filter((item) => {
    if (item.id !== id) {
      return item;
    }
  });
  localStorage.setItem("todolist", JSON.stringify(items));
};
const getLocalStorage = () => {
  return localStorage.getItem("todolist")
    ? JSON.parse(localStorage.getItem("todolist"))
    : [];
};

//All functions
const addItem = (e) => {
  e.preventDefault(); //javascript event function to prevent default behavior of browser
  const value = todo.value;
  const id = new Date().getTime().toString();
  if (value && !editFlag) {
    createList(id, value);

    //Deleteing and editing
    const deleteBtn = document.querySelector(".delete");
    deleteBtn.addEventListener("click", deleteItem);
    const edit = document.querySelector(".edit");
    edit.addEventListener("click", editItem);

    //Display alert
    displayALert("Item added", "success");

    //Show todocontainer
    todoContainer.classList.add("show-container");

    //Add to localstorage
    addToLocalStorage(id, value);

    //Setback to default
    setBackDefault();
  } else if (value && editFlag === true) {
    editElement.innerHTML = value;
    displayALert("value changed", "success");
    //Edit locastorage;
    editLocalStorage(editId, value);
    setBackDefault();
  } else {
    displayALert("please enter value", "danger");
  }
};

//Clear at all
const clearAll = () => {
  const items = document.querySelectorAll(".todo-item");
  if (items.length > 0) {
    items.forEach((item) => {
      todolist.removeChild(item);
    });
  }
  todoContainer.classList.remove("show-container");
  displayALert("empty lsit", "danger");
  setBackDefault();
  localStorage.removeItem("todolist");
};
//Delteing item
const deleteItem = (e) => {
  const elem = e.currentTarget.parentElement.parentElement;
  const id = elem.dataset.id;
  todolist.removeChild(elem);
  //if no todo then remove todocontainer
  if (todolist.children.length === 0) {
    todoContainer.classList.remove("show-container");
  }
  displayALert("item removed", "danger");
  setBackDefault();
  removeFromLocalStorage(id);
};
//Editing functions
const editItem = (e) => {
  const elem = e.currentTarget.parentElement.parentElement;
  editElement = e.currentTarget.parentElement.previousElementSibling;
  todo.value = editElement.innerHTML;
  editFlag = true;
  editId = elem.dataset.id;
  submit.value = "Edit";
};

//Add Eventlistener
todoform.addEventListener("submit", addItem);
clear.addEventListener("click", clearAll);
//load items
window.addEventListener("DOMContentLoaded", () => {
  let items = getLocalStorage();
  if (items.length > 0) {
    items.forEach((item) => {
      createList(item.id, item.value);
    });
  }
  todoContainer.classList.add("show-container");
});

const createList = (id, value) => {
  const element = document.createElement("div");
  const attr = document.createAttribute("data-id");
  attr.value = id;
  element.setAttributeNode(attr);

  element.classList.add("todo-item");
  element.innerHTML = `
            <p class="title">${value}</p>
            <div class="button-group">
                <div class="delete">
                <ion-icon name="trash-outline"></ion-icon>
                </div>
                <div class="edit">
                <ion-icon  name="create-outline"></ion-icon>
                </div>

            </div>
        `;

  //appendchild
  todolist.appendChild(element);
};
I hope this tutorial would have helped you to grasp the concept of javascript DOM and BOM property